
Reactor에서의 디버깅
Reactor는 처리되는 작업들이 대부분 비동기적으로 실행되고, Reactor Sequence는 선언형 프로그래밍 방식으로 구성되므로 디버깅이 쉽지않다.
Debug Mode
Hooks.onOperatorDebug()를 통해서 Debug Mode를 활성화하면 Reactor Sequence를 디버깅할 수 있다.
@Slf4j
class DebugModeExam {
  public static Map<String, String> fruits = new HashMap<>();

  static {
    fruits.put("banana", "바나나");
    fruits.put("apple", "사과");
    fruits.put("pear", "배");
    fruits.put("grape", "포도");
  }

  public static void main(String[] args) throws InterruptedException {
    Hooks.onOperatorDebug();

    Flux
        .fromArray(new String[]{"BANANAS", "APPLES", "PEARS", "MELONS"})
        .subscribeOn(Schedulers.boundedElastic())
        .publishOn(Schedulers.parallel())
        .map(String::toLowerCase)
        .map(fruit -> fruit.substring(0, fruit.length() - 1))
        .map(fruits::get)
        .map(translated -> "맛있는 " + translated)
        .subscribe(
            log::info,
            error -> log.error("# onError:", error));

    Thread.sleep(100L);
  }
}
Debug Mode를 활성화 하지 않았을 때 출력 형태

Debug Mode를 활성화 했을 때 출력 형태

⚠️ map operator가 너무 많다.
IDE에서도 말해주지만 map Operator가 너무 많아서 오베헤드가 발생할 수 있으며 에러를 확인하기도 힘들다.
- Debug Mode를 활성화 하지 않았을 때 map Operator에서 NPE가 발생하지만 map Operator가 4개나 존재하기 때문에 어떤 operator인지 확인이 어렵다.
Debug Mode를 활성화하면 Operator 체인상에서 에러가 발생한 지점을 정확히 알 수 있다.
- Operator 체인이 시작되기 전에 디버그 모드를 활성화 해야 한다.
Debug Mode의 한계
Hooks.onOperatorDebug();
디버그 모드의 활성화는 애플리케이션 내에서 비용이 많이 드는 동작 과정을 거친다.
- 애플리케이션 내에 있는 모든 Operator의 스택트레이스(Stacktrace)를 캡처한다.
- 에러가 발생하면 캡처한 정보를 기반으로 에러가 발생한 Assembly의 스택트레이스를 원본 스택트레이스 중간에 끼워 넣는다.
따라서 에러 원인을 추적하기 위해 처음부터 디버그 모드를 활성화하는 것은 권장하지 않는다.
용어 정리
- Assembly: Operator에서 리턴하는 새로운 Mono 또는 Flux가 선언된 지점
- Traceback: Debug Mode를 활성화해서 Operator의 Assembly 정보를 캡쳐하는데 이중에서 에러가 발생한 Operator의 스택트레이스를 캡처한 Assembly 정보
Production 환경에서의 디버깅 설정
Reactor에서는 애플리케이션 내 모든 Operator 체인의 스택 트레이스 캡처 비용을 지불하지 않고 디버깅 정보를 추가할 수 있도록 별도의 Java 에이전트를 제공한다.
1. build.gradle 파일에 추가해주기
compileOnly 'io.projectreactor:reactor-tools'
2. 프로그램 시작시 ReactorDebugAgent.init() 메서드가 호출되는지 확인하기

프로퍼티 기본값이 애플리케이션 시작 시, ReactorDebugAgent.init()이 자동으로 호출된다.
spring:
  reactor:
    debug-agent:
      enabled: true
- true가 기본값이며 false인 경우 애플리케이션 시작 전에 ReactorDebugAgent.init()을 직접 호출해야 한다.
checkpoint() Operator
Debug Mode는 애플리케이션 내에 있는 모든 Operator에서 스택트레이스를 캡처하는데, checkpoint() Operator를 사용하면 특정 Operator 체인 내의 스택트레이스만 캡처한다.
Traceback을 출력하는 방법
checkpoint()를 사용하면 실제 에러가 발생한 assembly 지점 또는 에러가 전파된 assembly 지점의 traceback이 추가된다.
@Slf4j
class CheckPointExam {
  public static void main(String[] args) {
    Flux
        .just(2, 4, 6, 8)
        .zipWith(Flux.just(1, 2, 3, 0), (x, y) -> x/y)
        .map(num -> num + 2)
        .checkpoint() // checkpoint operator 추가
        .subscribe(
            data -> log.info("# onNext: {}", data),
            error -> log.error("# onError:", error)
        );
  }
}
실행 결과
에러가 직접적으로 발생한 지점인지 아니면 에러가 전파된 지점인지 알 수 없지만 map() Operator 다음에 추가한 checkpoint() 지점까지는 에러가 전파되었다는 것을 예상할 수 있다.
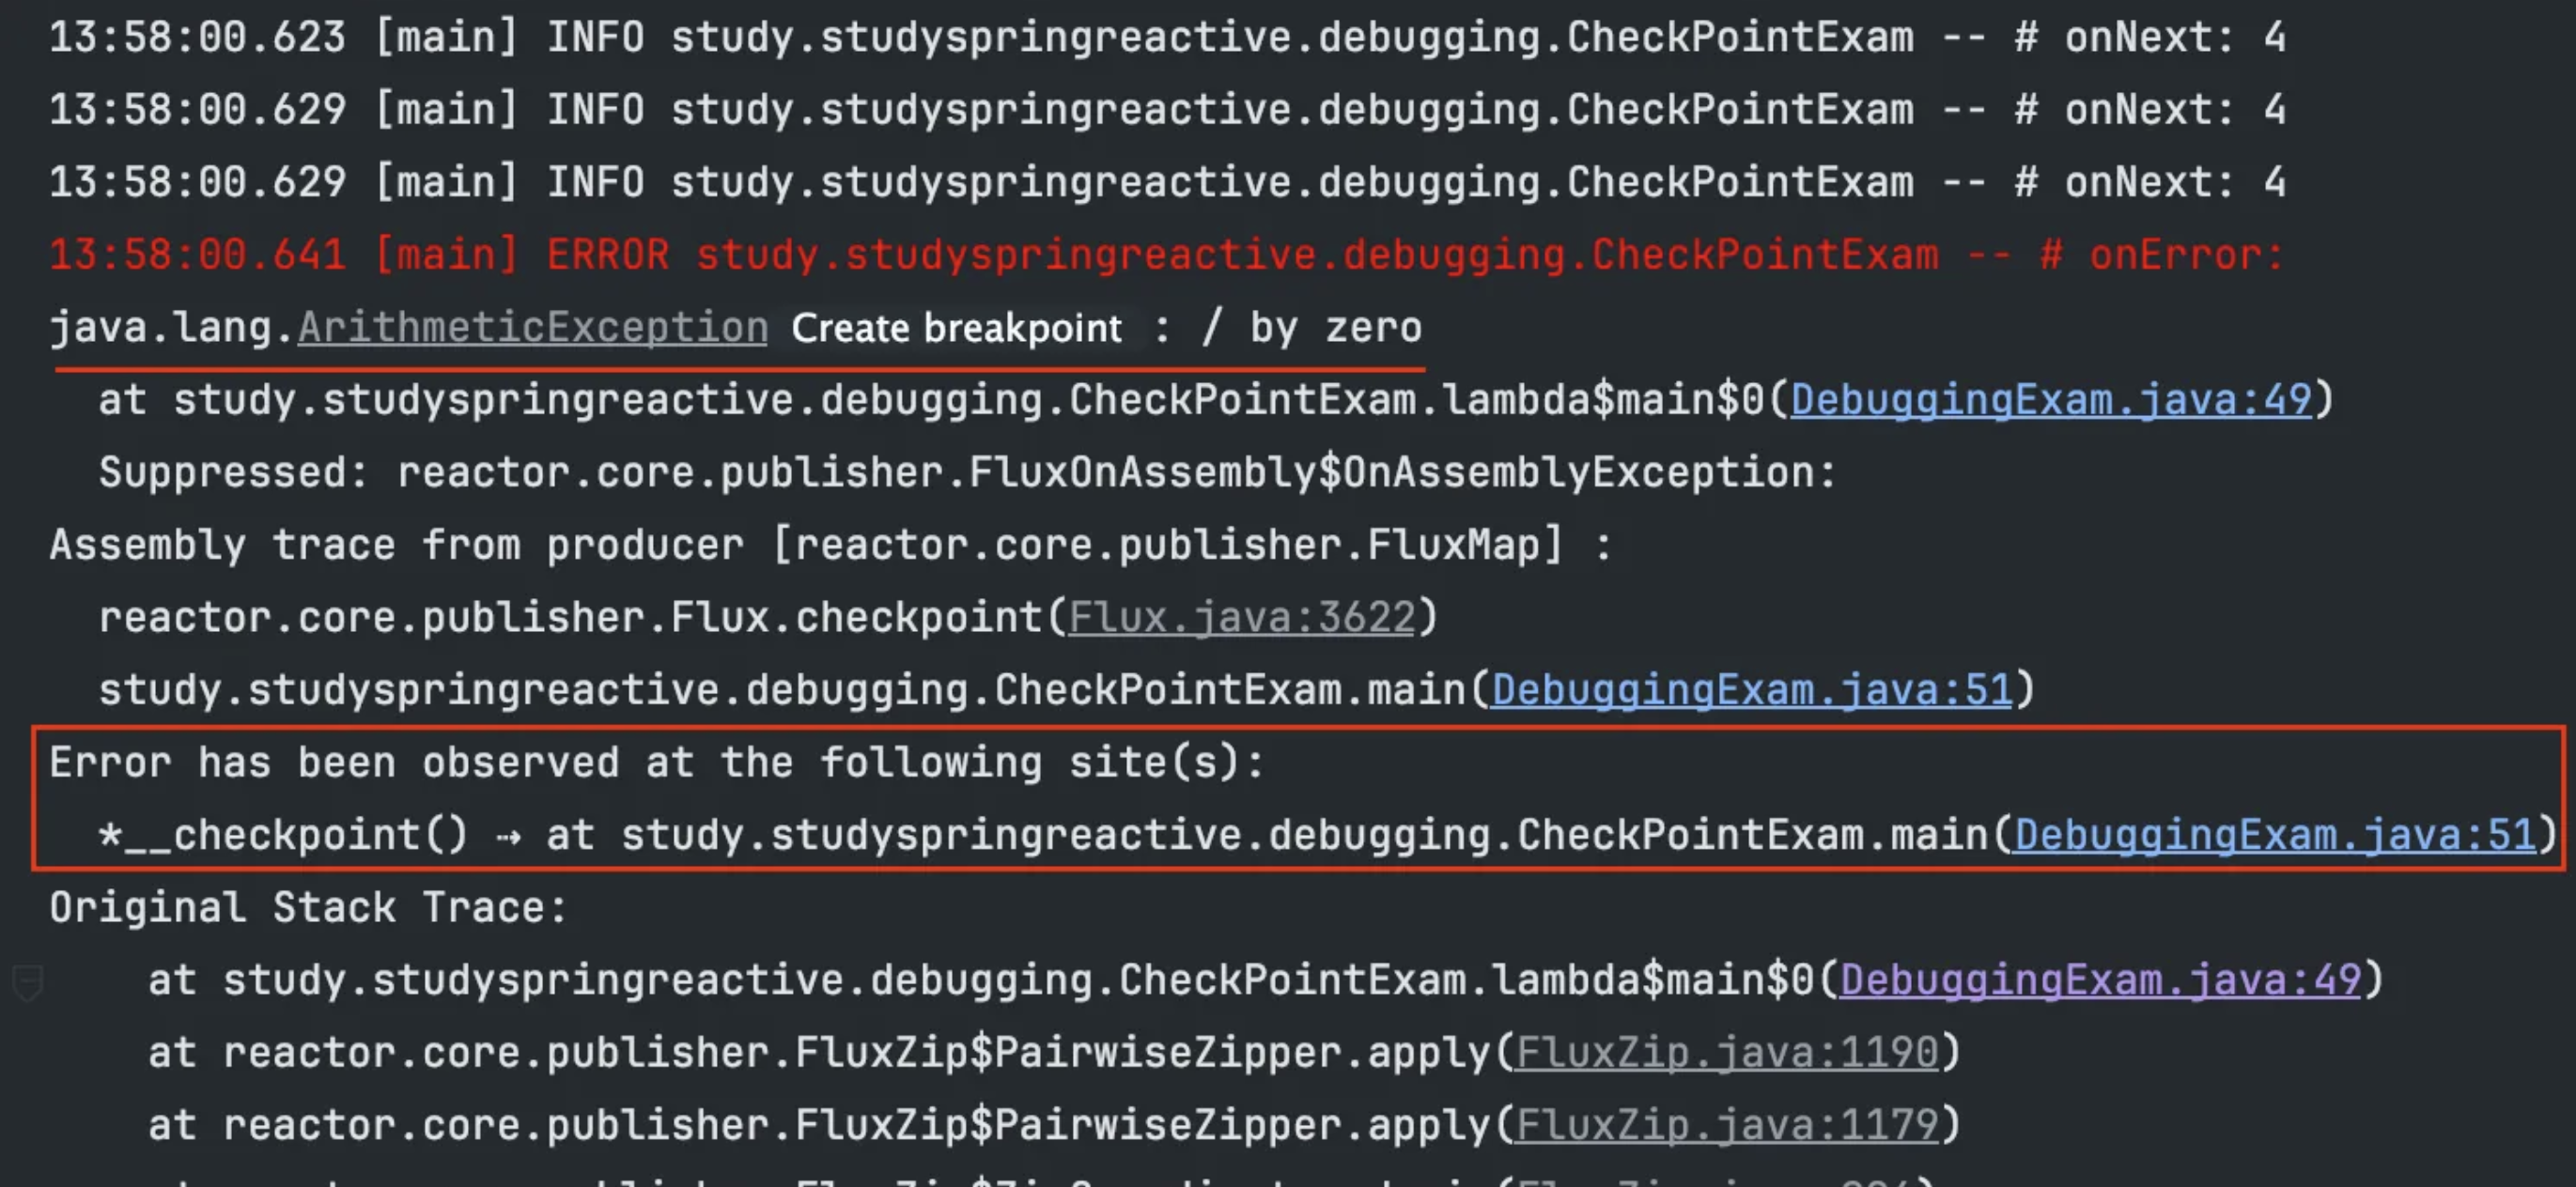
- 체크 포인트 위치를 zipWith() Operator 위로 변경하면 전파된 내용이 나오지 않는 것을 볼 수 있다.
checkpoint()를 더 추가한 경우
에러가 예상되는 지점을 정확하게 찾기 위해 checkpoint()를 추가했다.
@Slf4j
class CheckPointExam {
  public static void main(String[] args) {
    Flux
        .just(2, 4, 6, 8)
        .checkpoint() // 예외 전파 X
        .zipWith(Flux.just(1, 2, 3, 0), (x, y) -> x/y)
        .checkpoint() // 예외 전파 O
        .map(num -> num + 2)
        .checkpoint() // 예외 전파 O
        .subscribe(
            data -> log.info("# onNext: {}", data),
            error -> log.error("# onError:", error)
        );
  }
}
실행 결과
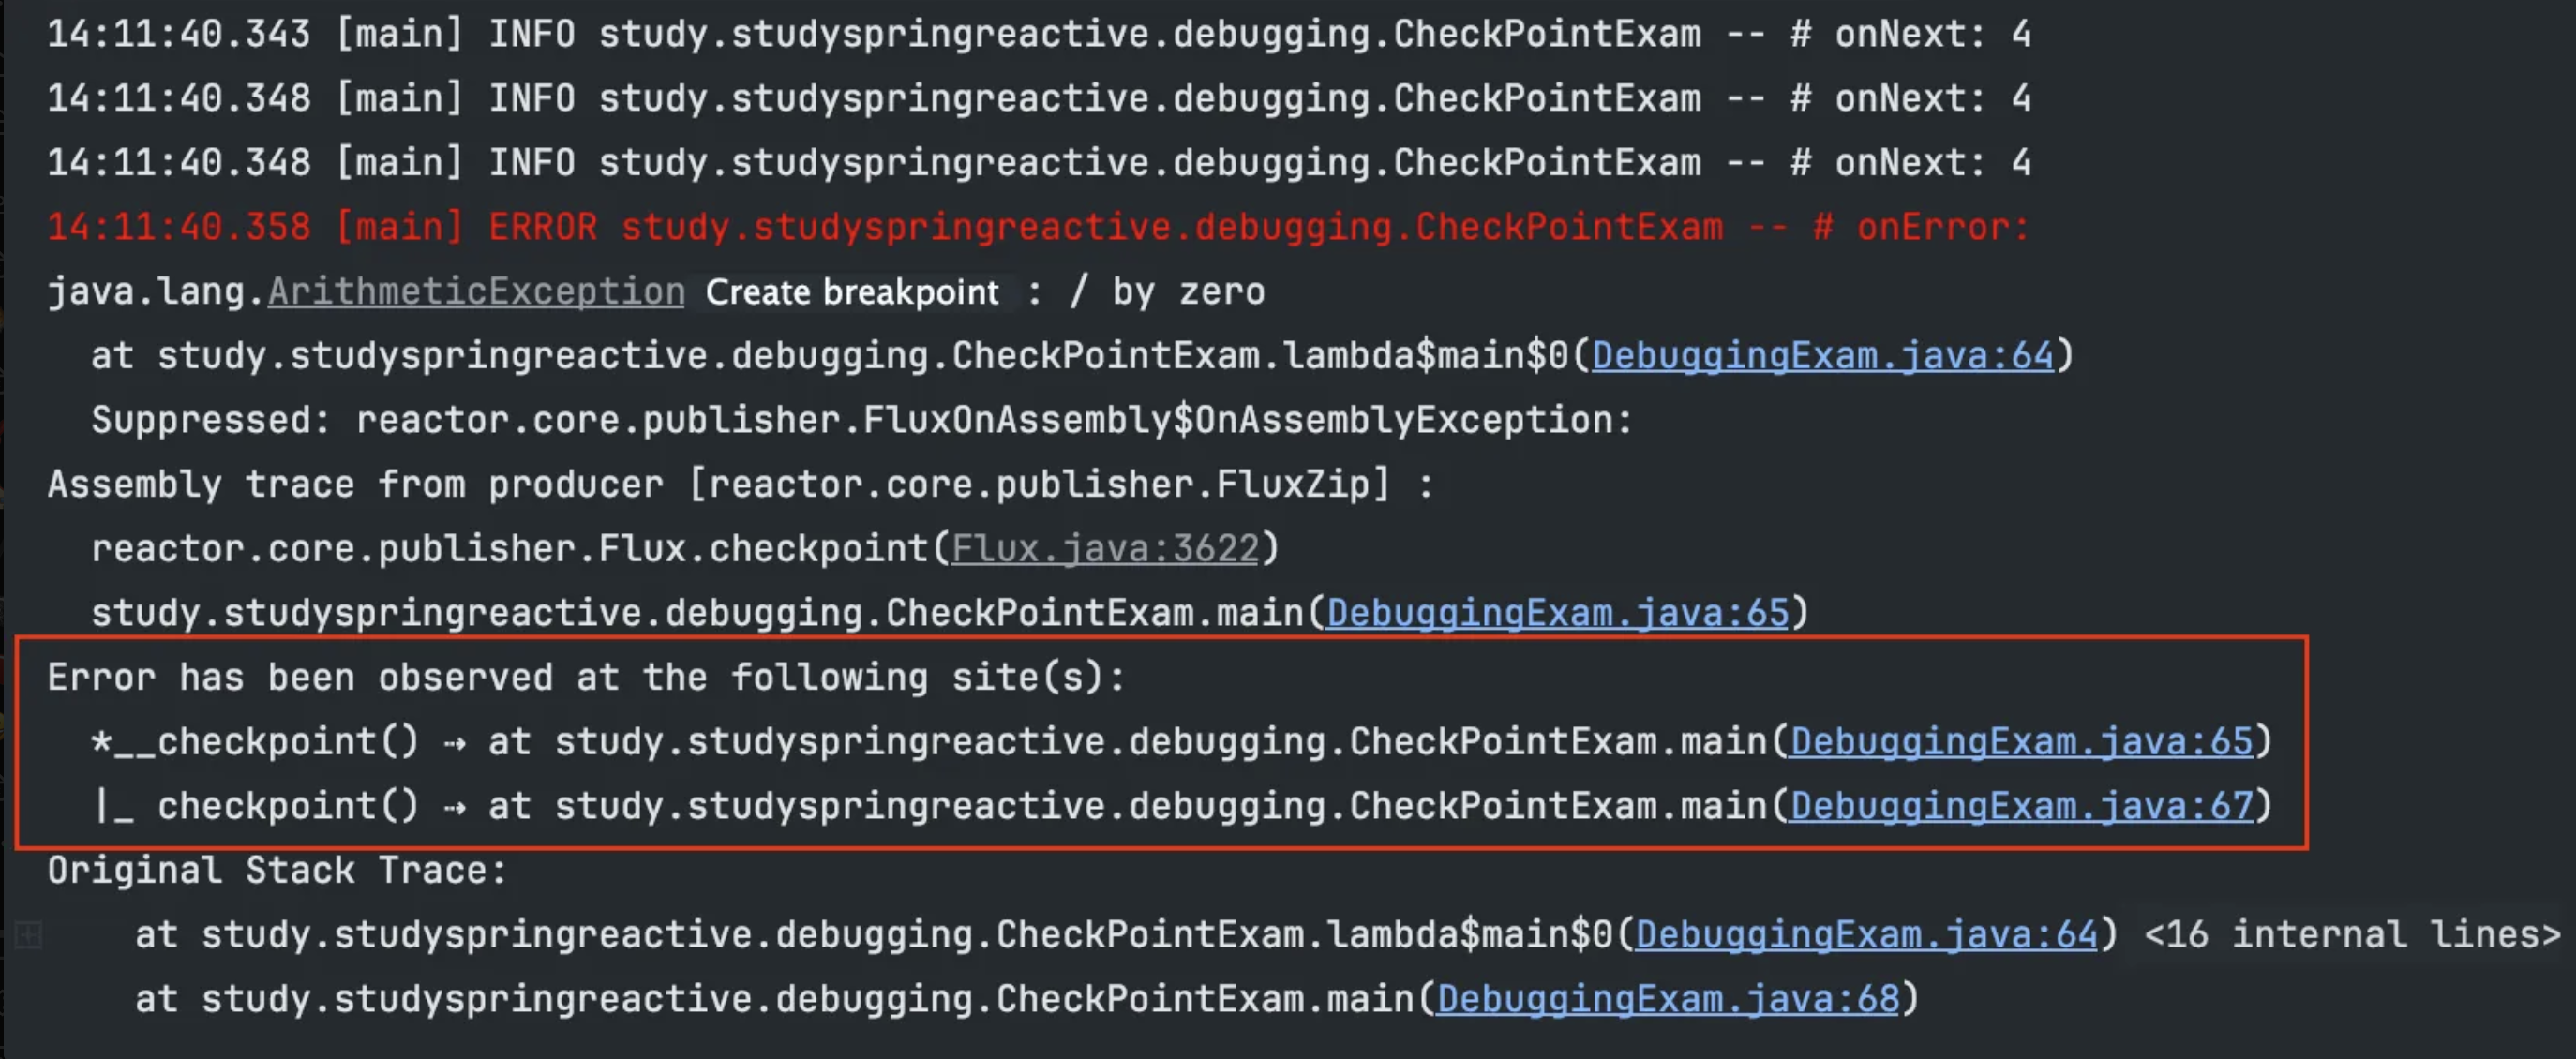
- zipWith() Operator 이전에 checkpoint()는 에러가 전파되지 않았고 이후에는 전파되었음을 알 수 있다.
- 즉, zipWith()에서 에러가 발생해 Downstream으로 전파되었음을 확실할 수 있다.
식별자를 포함한 Description을 출력해서 에러 발생 지점을 예상하는 방법
checkpoint(description)를 사용하면 Trackback을 생략하고 description을 통해서 에러 발생 지점을 예상할 수 있다.
@Slf4j
class CheckPointExam {
  public static void main(String[] args) {
    Flux
        .just(2, 4, 6, 8)
        .zipWith(Flux.just(1, 2, 3, 0), (x, y) -> x / y)
        .checkpoint("Example12_4.zipWith.checkpoint")
        .map(num -> num + 2)
        .checkpoint("Example12_4.map.checkpoint")
        .subscribe(
            data -> log.info("# onNext: {}", data),
            error -> log.error("# onError:", error)
        );
  }
}
실행 결과
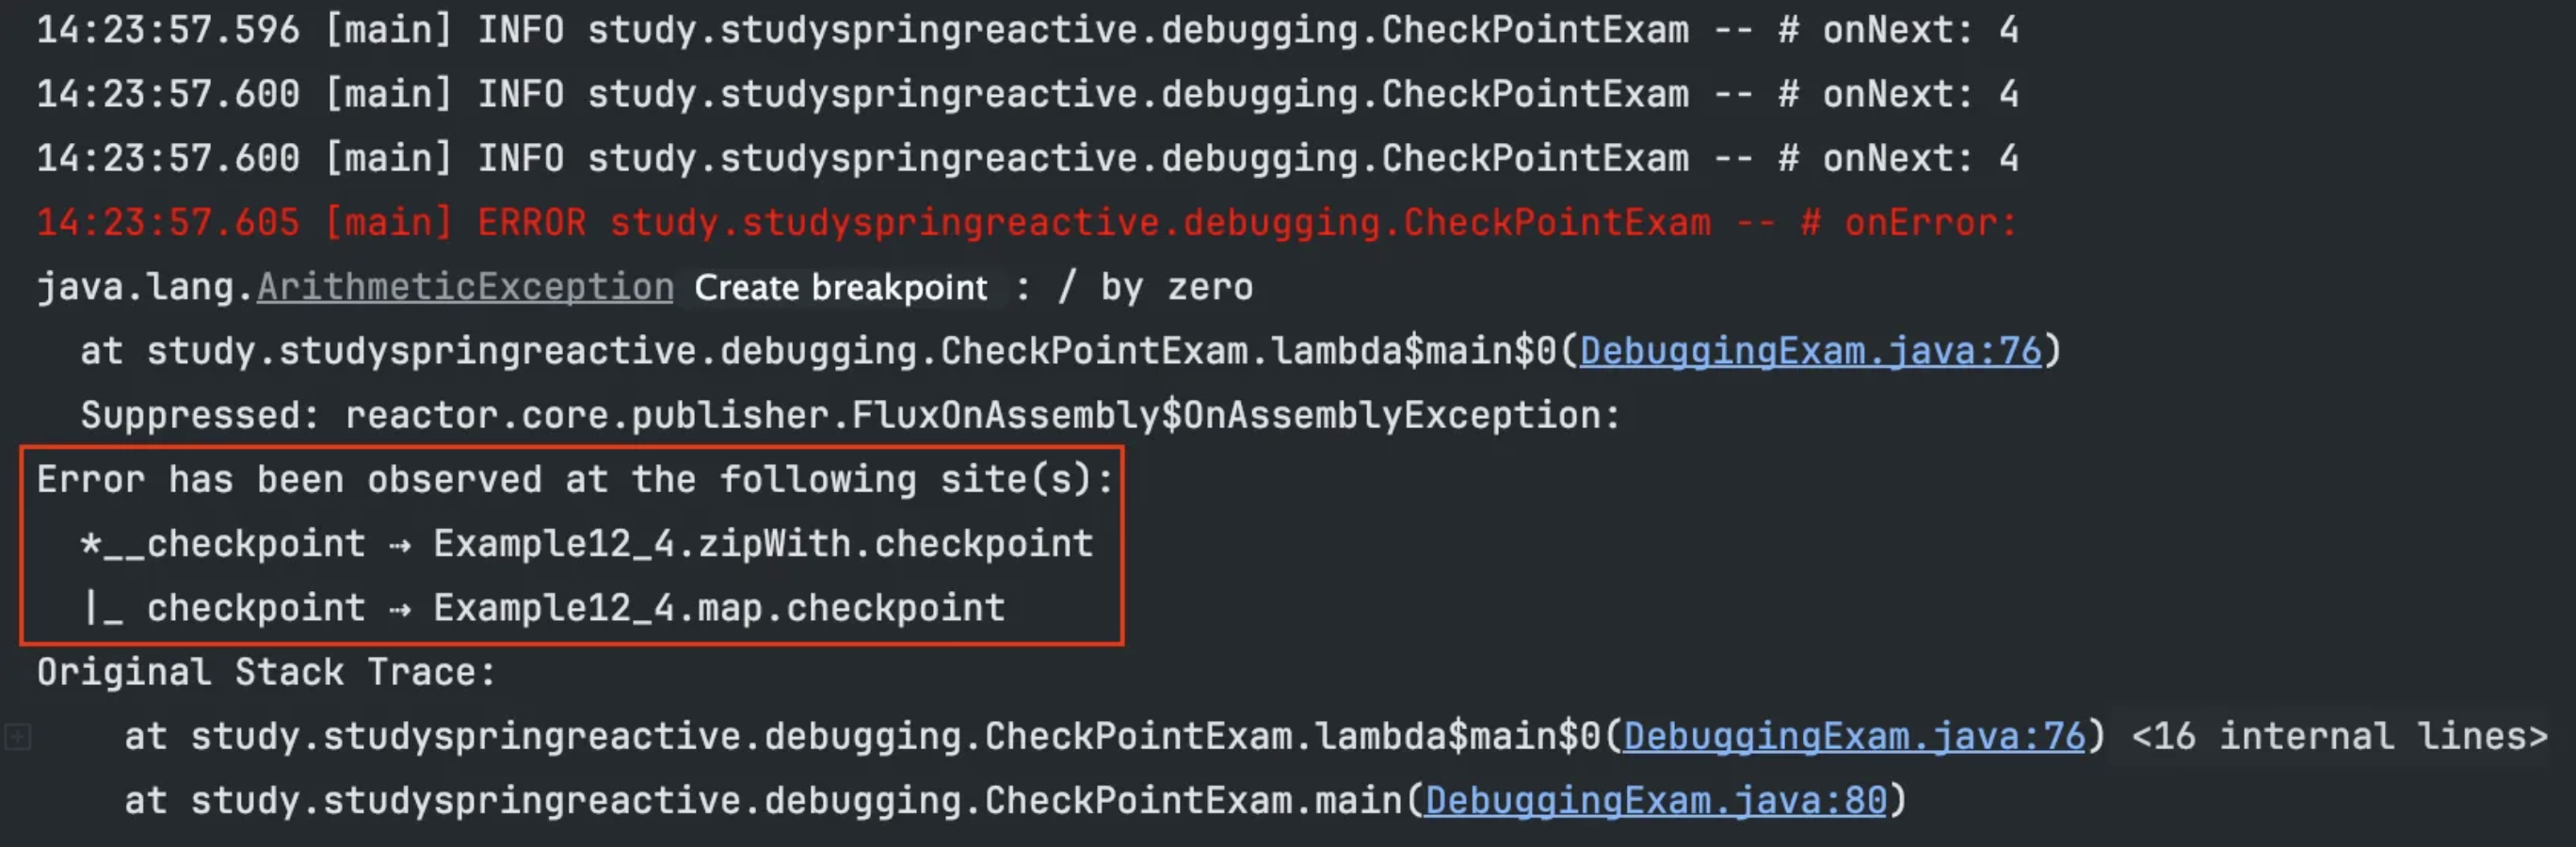
- checkpoint()의 파라미터로 입력한 description이 출력된 것을 확인할 수 있다.
Trackback과 Description을 모두 출력하는 방법
checkpoint()의 두번째 파라미터 값을 true로 설정하면 된다.
@Slf4j
class CheckPointExam {
  public static void main(String[] args) {
    Flux
        .just(2, 4, 6, 8)
        .zipWith(Flux.just(1, 2, 3, 0), (x, y) -> x/y)
        .checkpoint("Example12_4.zipWith.checkpoint", true)
        .map(num -> num + 2)
        .checkpoint("Example12_4.map.checkpoint", true)
        .subscribe(
            data -> log.info("# onNext: {}", data),
            error -> log.error("# onError:", error)
        );
  }
}
실행 결과

서로 다른 Operator 체인에서 checkpoint() 활용하기
@Slf4j
class CheckPointExam {
  public static void main(String[] args) {
    Flux<Integer> source = Flux.just(2, 4, 6, 8);
    Flux<Integer> other = Flux.just(1, 2, 3, 0);

    Flux<Integer> multiplySource = divide(source, other).checkpoint();
    Flux<Integer> plusSource = plus(multiplySource).checkpoint();

    plusSource.subscribe(
        data -> log.info("# onNext: {}", data),
        error -> log.error("# onError:", error)
    );
  }

  private static Flux<Integer> divide(Flux<Integer> source, Flux<Integer> other) {
    return source.zipWith(other, (x, y) -> x/y);
  }

  private static Flux<Integer> plus(Flux<Integer> source) {
    return source.map(num -> num + 2);
  }
}
곱하고 더하는 기능별로 여러 곳에 Operator 체인이 흩어져 있다.
Flux<Integer> multiplySource = divide(source, other).checkpoint();
Flux<Integer> plusSource = plus(multiplySource).checkpoint();
- 마지막 Operator 체인에 checkpoint()를 적용시킨 것이기 때문에 기능별로 에러가 전파되는지만 확인할 수 있다.
실행 결과

- checkpoint()를 각 Operator 체인에 추가하여 범위를 좁혀나가면서 에러 발생 지점을 찾아야 한다.
log() Operator
Reactor Sequence 동작을 출력된 로그를 통해서 디버깅이 가능하다.
@Slf4j
class LogExam {
  public static Map<String, String> fruits = new HashMap<>();

  static {
    fruits.put("banana", "바나나");
    fruits.put("apple", "사과");
    fruits.put("pear", "배");
    fruits.put("grape", "포도");
  }

  public static void main(String[] args) {
    Flux.fromArray(new String[]{"BANANAS", "APPLES", "PEARS", "MELONS"})
        .map(String::toLowerCase)
        .map(fruit -> fruit.substring(0, fruit.length() - 1))
        .log()
//                .log("Fruit.Substring", Level.FINE)
        .map(fruits::get)
        .subscribe(
            log::info,
            error -> log.error("# onError:", error));
  }
}
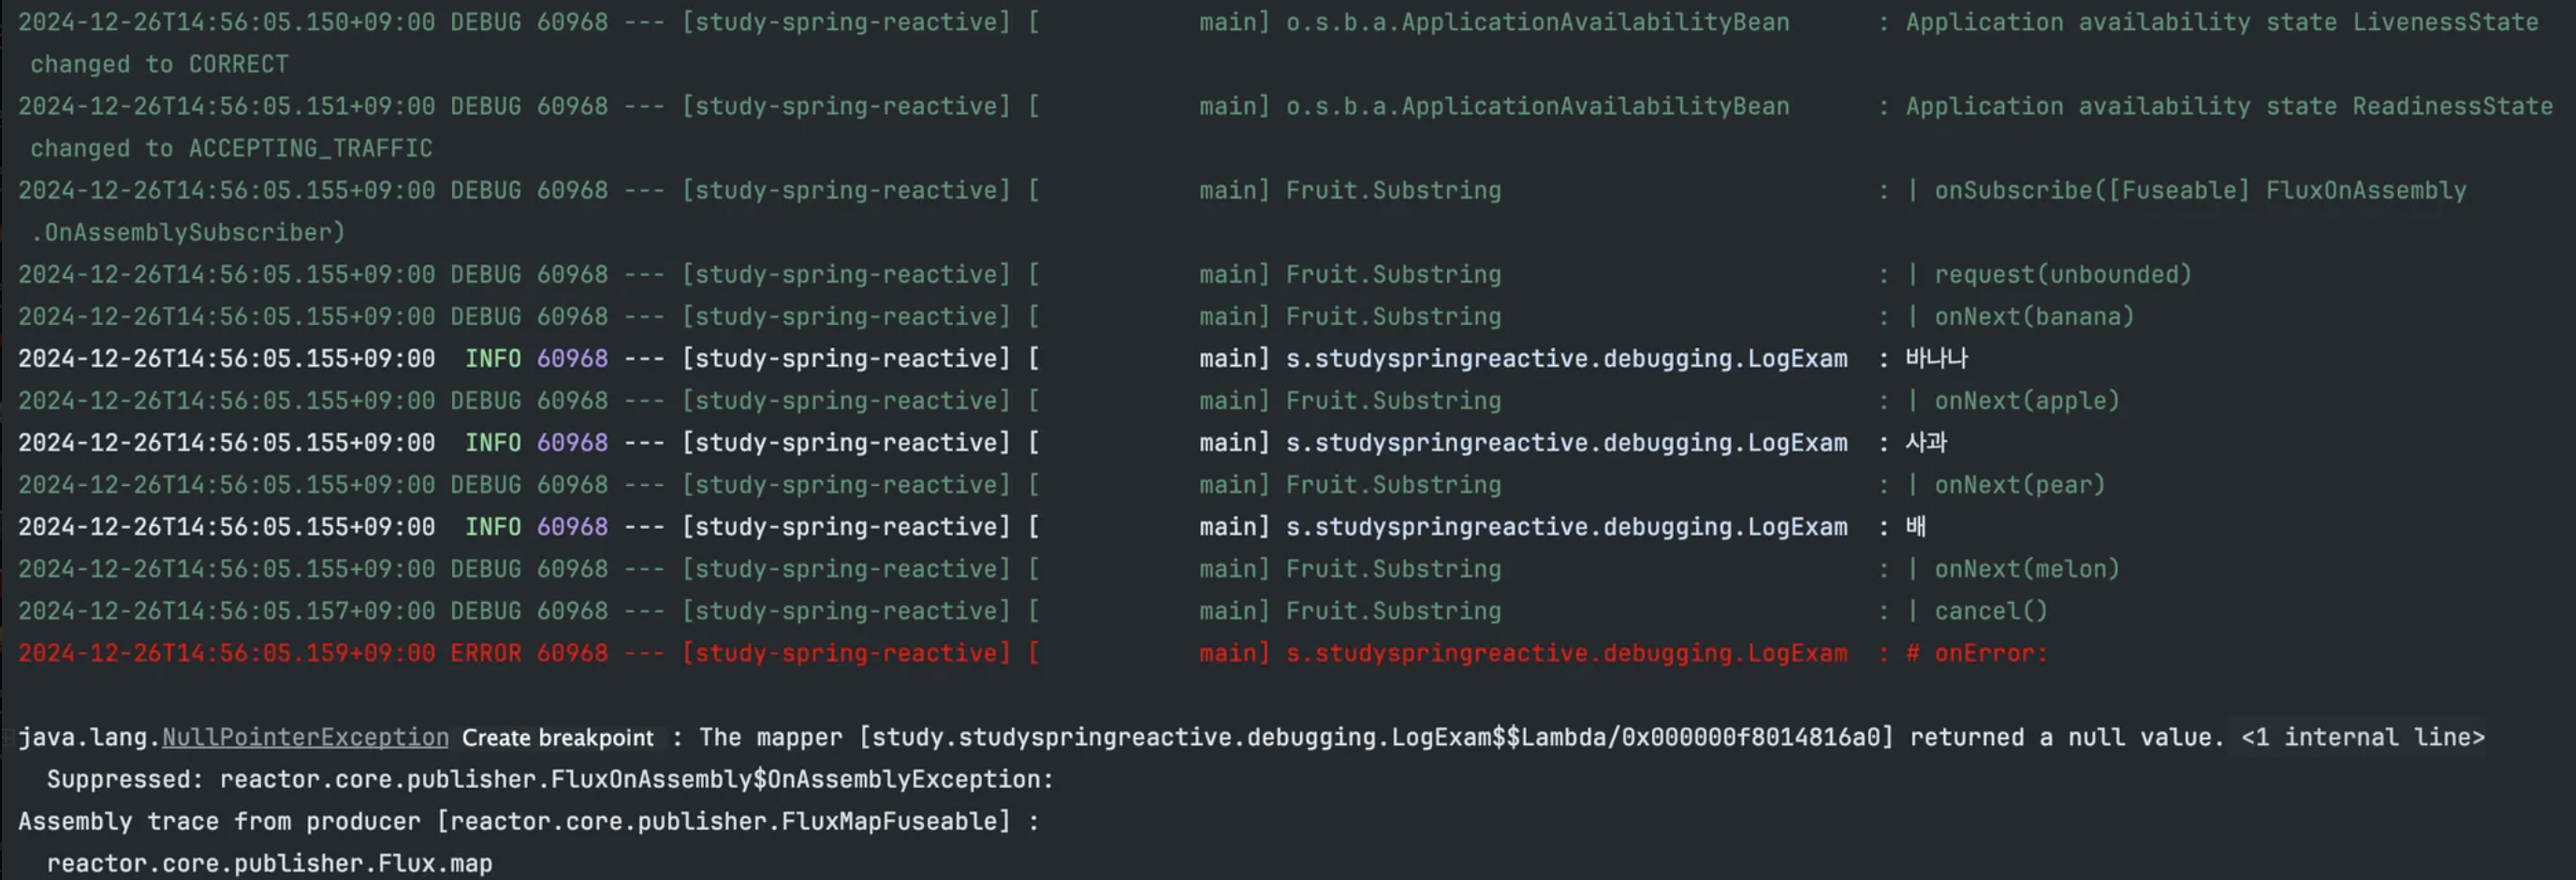
실행 결과

- 두 번째 map() Operator가 melon 이라는 문자열을 emit 했지만 이후의 어떤 지점에서 문자열을 처리하는 중에 에러가 발생했음을 알 수 있다.
로그를 분석하기 쉽게 로그 레벨을 변경하자
.log("Fruit.Substring", Level.FINE)
- Level.FINE은 Java에서 지원하는 로그레벨이며, Slf4j 로깅 프레임워크에서 사용하는 로그 레벨 중 DEBUG 레벨에 해당한다.
실행 결과
- 로깅 레벨이 DEBUG까지 확인할 수 있어야 콘솔에서 출력이 가능하다.
- log() Operator는 사용 개수에 제한이 없기 때문에 필요하다면 다른 Operator 뒤에 추가해서 Reactor Sequence의 내부 동작을 좀 더 상세하게 분석하면서 디버깅할 수 있다.
'Reactive Programming' 카테고리의 다른 글
| Testing (1) | 2025.01.02 |
|---|---|
| Context (0) | 2024.12.22 |
| Scheduler (0) | 2024.12.16 |
| Sinks (1) | 2024.12.04 |
| Backpressure (0) | 2024.11.19 |